Trading Partner File Upload
This action uploads a file to a remote system.
Parameters
This section describes the fields on the Parameters tab.
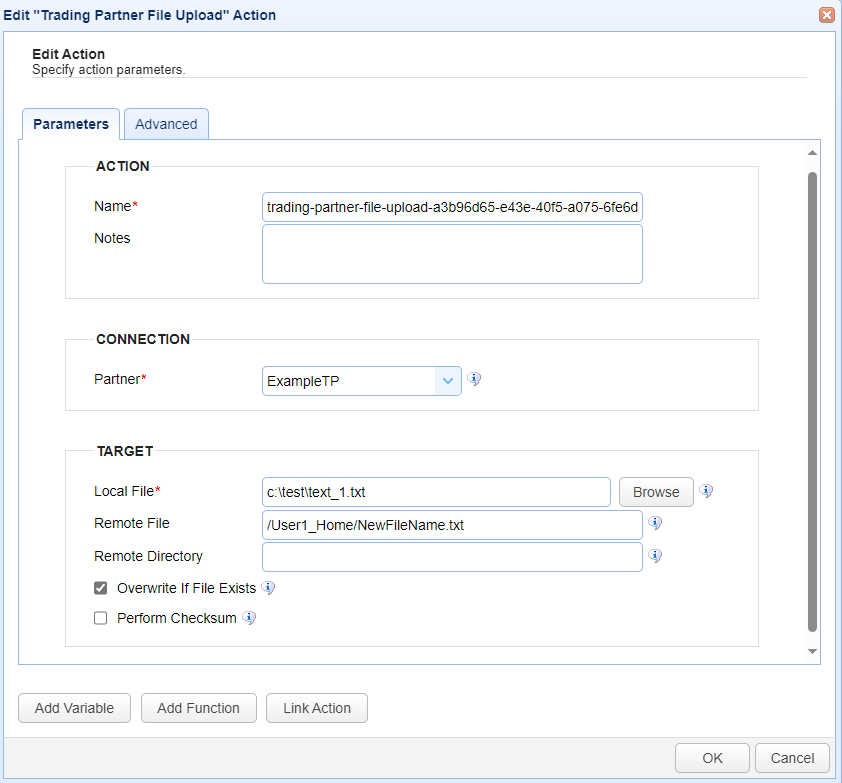
ACTION
Name — Identifies the name of the Action. The system-generated default name, depicted in the image above, can be changed to a different name to suit your preferences. The Name must be unique within the current Trigger workflow.
Notes — Describes the action.
Tip: The values in the Name and Notes fields are displayed in a tooltip when you mouse over an Action node.
CONNECTION
Partner - This is the trading partner that will be used in the trigger action. The drop down list will display all the trading partners created in
AUTOMATION > Trading Partnersthat are compatible with this action. Select the desired trading partner from the list. The connection information that will be used is configured in the selected trading partner (for example, hostname, port, etc.).
TARGET
Local File - This is the local file to upload to the remote directory.
Remote File - This is the file name to upload. This optional field allows you to specify an alternative remote file name (one that is different from the source file name). You can specify the file's full path, or just the file name. If only the file name is specified, then the user's root path is used as the location to upload the file. This field's value takes precedence over the Remote Directory field. The Remote Directory field is ignored when the Remote File field is being used.
Remote Directory - This is the virtual path name that identifies where to upload the file to on the remote system. This field is only used when the Remote File field is blank. When the remote directory is specified, it must be an existing directory accessible to the user identified in the Trading Partner's Connection fields.
Overwrite if File Exists - This field, if checked, will allow the system to overwrite the existing file.
Perform Checksum - This field, if checked, will result in a file comparison after the upload to ensure data integrity.
Advanced
This section describes the fields on the Advanced tab.
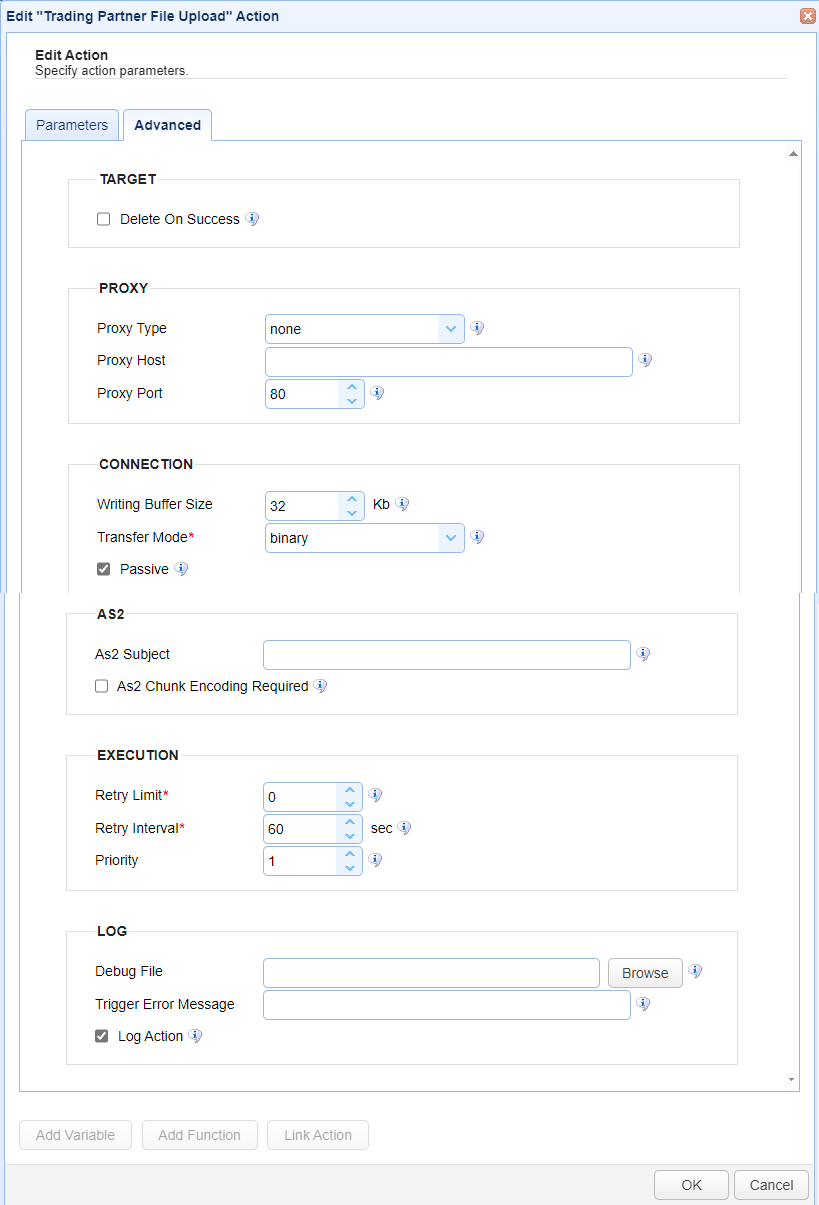
TARGET
Delete on Success - This field, if checked, will delete the source file upon the completion of the transfer.
PROXY
Proxy Type - If a proxy is configured, select the proxy type. Options include none, HTTP, SOCKS4 and SOCKS5
Proxy Host - If a proxy is configured, enter the proxy host.
Proxy Post - If a proxy is configured, enter the proxy port number.
CONNECTION
Writing Buffer Size - This is the amount of data (KB) that can be written in 1 request. When the write buffer is full, the system pushes the data to its destination. See Trigger Actions with Buffer Size Fields for more information.
Transfer mode — Sets the Transfer Mode which includes binary, ascii or auto. This parameter is not used for AFTP, AS2, SFTP, and WebDAV trading partners.
Passive — When selected, passive mode is used.
AS2
As2 Subject — This field is the As2 subject.
As2 Chunk Encoding Required — This field, if checked, will enforce chunk encoding.
Note: These fields are only applicable when the trading partner type is As2. They are otherwise ignored.
EXECUTION
Retry Limit — Identifies the number of times a failed Action is retried before aborting the process.
Retry Interval — Identifies the number of seconds in between retries.
Priority — Identifies the Action’s priority. An Action can be interrupted by an Action with a higher priority. The highest priority is 1. The maximum priority value is 1000. Priority comes into play when certain scenarios occur, like when Triggers or transfers are exceeded (see Settings for more information).
LOG
Debug file — Identifies the complete file path where debugging information is saved during an Action's execution. The system logs information and errors for both successful and failed Actions.
The file can be located anywhere on the MFT Server system.
If the file does not exist, it is created, and debug information is appended to it.
If the file already exists, debug information is appended to the existing file.
Debug file notes
It is recommended you specify a debug file name that will allow you to quickly identify which Action produced the file. If you would like the file name to match the name of your Trigger, use the built-in event variable %TriggerName%.
If you would like to use a new file each time the Action executes, you can append a date/time stamp the root of the file name.
Example: %DateFormat(CurrentDate(),"MM.dd.yyyy_H.m.s")%.txt. This will result in individual debug files each time an Action is run, instead of using a single file that may grow overly large when it is repeatedly appended to.Debug files are not purged by the system. To prevent too many files from growing unchecked, you can create a Current Time event Trigger, using a condition (e.g. DayofWeek = 5) to clean up the files at the time specified using a
Delete FilesAction. See Using time based triggers.If you plan on using a single directory on the MFT Server to store all the debug files, you can create a global variable in
Triggers > Settingsand reference that variable in the debug file name.Example: %GetGlobalVariable("DirName")% where DirName consists of a directory name. If the location of the directory should ever change, you can update the value of one global variable to reflect the change.See below an example debug file name that uses all the file naming tips described in this section.
Example: %GetGlobalVariable("DirName")%%TriggerName%%DateFormat(CurrentDate(),"MM.dd.yyyy_H.m.s")%.txt, where the DirName global variable is equal to C:\MFTServerDebugFiles\.
Trigger Error Message — Used when a Trigger Action fails. The two uses are described below.
The Trigger Error Message is displayed in the
Trigger Errorcolumn of the Action history (Triggers > History > View).
If you create an error-handling Trigger, the Trigger Error Message is passed to the error-handling Trigger.
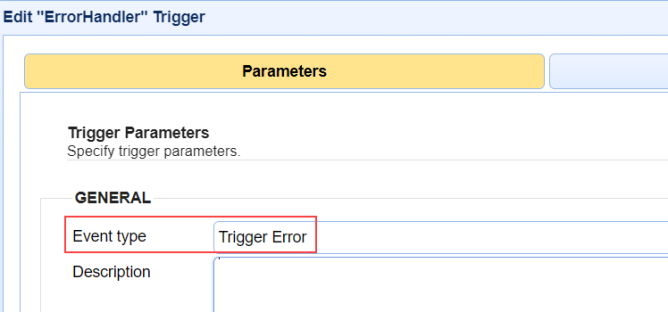
An error-handling Trigger is a distinct Trigger that uses the
Trigger ErrorEvent type, as selected in theTrigger > Parametersdialog.If a Trigger Error event occurs, the Trigger Error Trigger runs.
The Trigger Error Message is accessible in the Trigger Error Trigger as a variable named TriggerErrorMessage.
The image below depicts the
Trigger Error Messagedisplayed in the history of a failed Trigger Action.

The image below depicts selecting the
Trigger ErrorEvent type used to handle Trigger errors.
The image below depicts a Trigger Action (part of the Trigger Error Trigger workflow) accessing a
Trigger Error Message. This is accomplished using the TriggerErrorMessage variable. To reference built-in variables, enclose the variable name in percent signs (%).
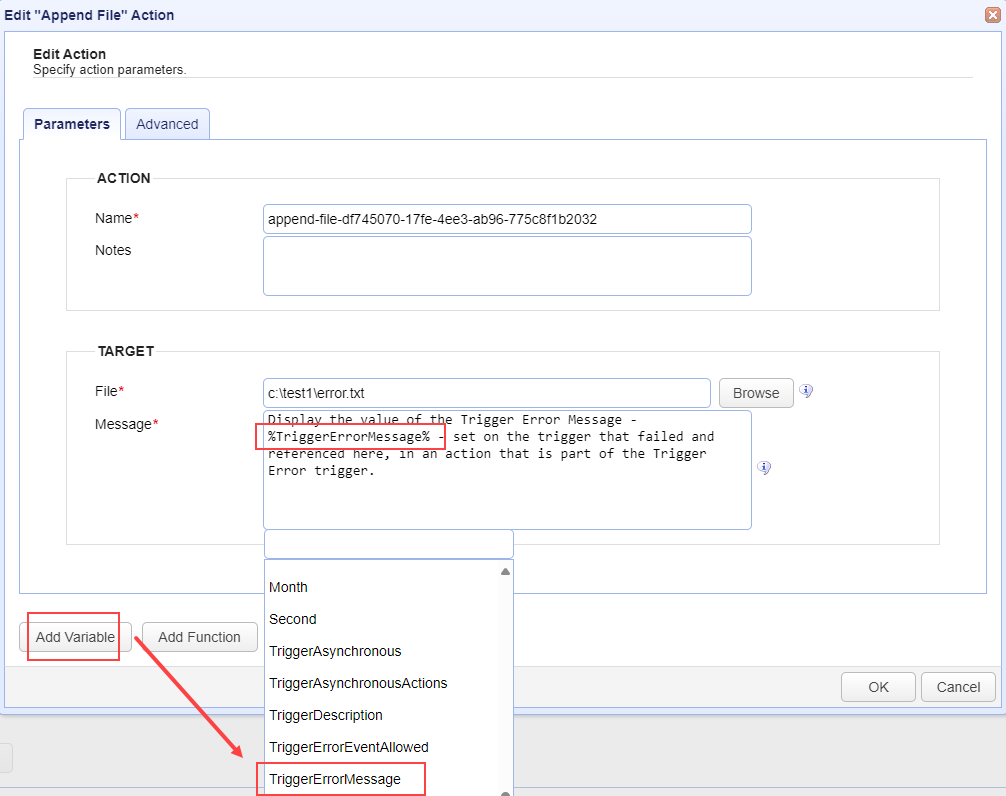
As a practical use case example, you can reference the
Trigger Error Messagein the body of an Email Action that is part of the Trigger Error workflow. The email alerts interested parties that a Trigger Action failed.Log Action — When selected, Trigger Action records are added to the
Domain > AUDIT > Loggingmodule. The state of the Action is included, such as action started, action completed, and action failed. When unselected, Action records are not added to the Logging module. However, the Trigger itself is still logged.
Buttons
Add Variable— Displays a list of built-in event variables. Each Trigger has several event variables you can use in one or more of the Trigger Action fields. When a variable is selected from the list, it is added to the Action field that is currently active. Built-in event variables are enclosed using the percent sign (e.g., %DomainName%).
In addition to using built-in variables, you can also specify a user-defined global variable, created in
AUTOMATION > Triggers > Settings. To reference a global variable (Defining global variables), use the %GetGlobalVariable% function.
Example: %GetGlobalVariable("DirName")% retrieves the global variable named DirName. When using global variables, specify the variable name enclosed in quotes, as depicted in this example.
Add Function— Displays a list of built-in functions. Functions are useful for formatting or parsing a Trigger event variable. When a function is selected from the list, it is added to the Action field that is currently active. For more details about functions and their usage, see Function types.
Link Action— Displays a list of Actions. When an Action is selected, the Action ID is returned.
An Action ID (a string of alphanumeric characters) is an input parameter used in the
GetActionResultfunction. This function returns the results of a previously executed Action in the current Trigger workflow. This means that Action results can be passed to a linked (following) Action.
Note: TheGetActionResultfunction also supports using the ActionNameas an input parameter. This is an enhancement added in a more current version of MFT Server.Using Link Action
Select a field in the Trigger Action that you want to populate using the results of a previous Action.
Click Add Function. A list of functions displays.
Select GetActionResult(actionId). The field displays %GetActionResult(actionId)%.
Highlight the word
actionIdin the field.
Click Link Action. A list of Actions displays.
Select an Action. The actionId text is replaced with the Action ID.
Example: The GetActionResult function looks similar to this: %GetActionResult("bee7cd8b-8021-4e19-8f76-1ae382e60c9d")%