Installing on Linux
This section describes how to install MFT Server on a Linux system using either the RPM or ZIP installer file, downloaded from the JSCAPE website.
Before installing MFT Server, you must create a database that will serve as the MFT Server backend database. See Databases for a list of supported database types.
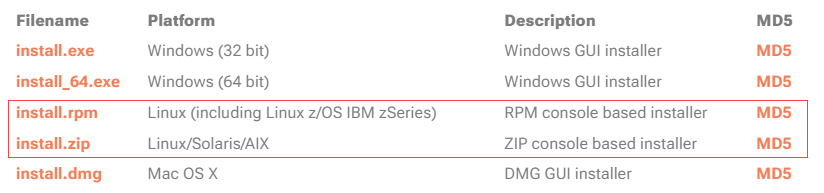
Select the installation instructions based on the file name you downloaded from the JSCAPE website.
If you are running MFT Server in a high availability (HA) environment, review this information before installing the product - Configuring a centralized global datastore
-
Place the
install.rpmfile in a directory on the destination server. -
Run the following command from the directory where you placed the RPM file:
rpm -iv install.rpmExample: rpm -iv mft-server-install-2025.1.0.528.rpmSuccessful command reply: (when installing version 2025.1.0.528).
Verifying packages...
Preparing packages...
mft_server-2025.1.0.528-1.i386
After the above command runs, a new directory named
mft_severis added to the opt directory (i.e.,/opt/mft_server).Note: The commands you are required to enter in the following steps must be done from within the mft_server directory. Therefore, navigate to the mft_server directory (i.e., runcd /opt/mft_server). -
Configure and initialize the MFT Server database.
Follow the instructions below to either initialize your database or the built-in H2 database, depending on which one you are using.
Initialize your database (applies when you are using one of the supported third-party databases, and not the built-in H2 database)
Run the following commands:
3a.
./js-database-configuration -configure -url <URL> -user <DB user> -password <DB Password>- For more details see js-database-configurationExample:./js-database-configuration -configure -url jdbc:mysql://mftserverdb.d7movljn.us-west-2.rds.amazonaws.com:3306 /MFT_Server -user admin -password '***'Next, run the init command to initialize the database schema:
3b.
./js-database-configuration -initCreate and Initialize the H2 database (applies when you are using the built-in H2 database, and not a supported third-party database).
Run the following commands:
3c.
./js-database-configuration -configureSuccessful command reply:
MFT Server Database Application v. <MFT Server version number and release date>
Saving application database configuration...
Done.
3d.
./js-database-configuration -initSuccessful command reply:
MFT Server Database Application v. <MFT Server version number and release date>
Initializing application database...
Done.
-
Add an administrative user. This is the account used to log in to the MFT Server Manager user interface. MFT Server Manager is where you configure MFT Server and its associated services, Users, Trading Partners, etc. Run the following command:.
./js-addadmin -db -username [username] -password [password] -saExample:./js-addadmin -db -username admin -password secret -saSuccessful command reply:
MFT Server Create Administrator Application v. <MFT Server version number and release date>.
Creating administrator 'admin'...
Done.
-
Configure Administration Service. The Administration service is used to provide programmatic access to MFT Server using the
Java Management API. Historically, the MFT Server Manager UI was written using the Java Management API. The UI was rewritten using the REST API. Although the user interface written using the Java Management API has been retired, the ability to access MFT Server using the Java Management API is still supported.Note: If you do not plan on using Java API calls, you can disable the host and port (after the installation) by accessing the MFT Server Manager user interface, then navigating toSettings > MANAGER SERVICE > Manager Service. Uncheck theEnable Manager Servicecheckbox.Run the following command:
./js-server-configuration -host [ip address] -port [port] -timeout [timeout in seconds]Example:./js-server-configuration -host 0.0.0.0 -port 10880 -timeout 60Successful command reply:
MFT Server Management Configuration Application v. <MFT Server version number and release date>.
Done.
This will configure your MFT Server Administration Service, where [ip address] and [port] are the IP/port that you want the MFT Administration Service to listen on, The default port is 10880. The [timeout in seconds] is the timeout value for this service.
Note: The IP address0.0.0.0is a special address that instructs the service to listen on all available network interfaces.Note: If you do not plan on using Java API calls, you can disable the host and port (after the installation) by accessing the MFT Server Manager user interface, then navigating toSettings > MANAGER SERVICE > Manager Service. Uncheck theEnable Manager Servicecheckbox. -
Configure the Web/REST settings.
The Web/REST settings are configured for access to MFT Server via the MFT Server Manager web-based user interface, and for programmatic access using REST API calls. MFT Server Manager is the interface used to manage all aspects of MFT Server, like creating services, Users, Trading Partners, and configuring settings. The same type of configurations can be performed programmatically using REST API calls. The MFT Server Manager was written using the REST API. The REST
IPandportidentify the IP and port that MFT Server listens on.Run the following command:
./js-web-configuration -host [REST ip address] -port [REST port] -timeout [timeout in minutes]. The default port is 11880.Example:./js-web-configuration -host 0.0.0.0 -port 11880 -timeout 10Successful command reply:
MFT Server Web Configuration Application v <MFT Server version number and release date>.
Saving configuration...
Done.
-
Configure the credentials used when invoking command line utilities. Make sure the user and password parameters match the username and password that were used earlier in the
js-addadmincommand (Step 4).Run the following command:
./js-client-configuration -host [host] -port [port] -timeout [timeout in seconds] -user [username] -password [password]Example:./js-client-configuration -host 0.0.0.0 -port 10880 -timeout 60 -user admin -password secretSuccessful command reply:
MFT Server Client Configuration Application v <MFT Server version number and release date>.
Saving configuration...
Done.
-
Generate a Server Key. Run the following command:
./js-add-server-key -rsa -size 4096 -alias example_rsa- Note, example_rsa is the name of the key. Feel free to name it whatever you would like. The recommended key size is 4096.Note: The Server Key can also be created using the MFT Server Manager, after the installation. SeeKeys > Server Keys > Generate > Generate Key.Successful command reply:
MFT Server Create Server Key Application v. <MFT Server version number and release date>
Creating server key '<key name>'...
Done.
-
Copy the license key file to the
etcdirectory that is relative to MFT Server's installation directory (e.g., /opt/mft_server/etc). This must be done before attempting to start the service.Note: The license key file is provided to each customer in a zip file. The MFT Server license is in the zip file'sJSCAPE MFT Serverfolder. It is namedlicense.lic. -
Startup Administration Service. From the
/opt/mft_serverdirectory run the following command:./start_service.shSuccessful command reply:
Starting Server
To verify that MFT Server is running, enter: ps aux | grep mft_server
If MFT Server is not running, navigate to the MFT Server log file: /<installdir>/mft_server/var/log
Enter: cat server0.log - This displays the contents of the file in the terminal window.
Once your system is up and running, you can access the web-based user interface named MFT Server Manager. The URL to enter in your web browser (e.g., http://localhost:11880) is based on the information you entered in Step 6 of the installation process. After successfully accessing the application, you will be prompted login. The credentials to use are based on the account information you specified in Step 4 of the installation process. See the links below for more details.
See also
Accessing the user interface - MFT Server Manager - This is the web-based application used to configure and manage MFT Server.
Auto-start using SysVinit scripts
If you intend to run MFT Server on Java 9 or Java 10 read Running on Java 9 or above
To install using the ZIP file, perform the following steps as a user with root privileges.
-
Place the installation zip file in a directory on the destination Linux server. The directory commonly used is /opt. This is recommended but not required.
-
Run the following command from the directory where you placed the zip file.
unzip install.zip.Example: Using the 2025.1 zip file downloaded from the JSCAPE website, the command is:unzip mft-server-install-unix-2025.1.0.528.zipA directory named
mft_serveris created within the directory where you placed the zip file and ran the unzip command. For example, if you ran it from the /opt directory, you will see a directory structure as follows: /opt/mft_server.Note: The commands you are required to enter in the following steps must be done from within the mft_server directory. Therefore, after running the unzip command, navigate to the mft_server directory. For example, entercd mft_server. -
Configure and initialize the MFT Server database. Follow the instructions to either initialize your database or the built-in H2 database, depending on which one you are using.
Initialize your database (applies when you are using one of the supported third-party databases, and not the built-in H2 database)
Run the following commands:
3a.
./js-database-configuration -configure -url <URL> -user <DB user> -password <DB Password>- For more details see js-database-configurationExample:./js-database-configuration -configure -url jdbc:mysql://mftserverdb.d7movljn.us-west-2.rds.amazonaws.com:3306 /MFT_Server -user admin -password '***'3b. Next, run the init command to initialize the database schema:
./js-database-configuration -initCreate and Initialize the H2 database (applies when you are using the built-in H2 database, and not a supported third-party database).
Run the following commands:
3c.
./js-database-configuration -configureSuccessful command reply:
MFT Server Database Application v. <MFT Server version number and release date>
Saving application database configuration...
Done.
3d.
./js-database-configuration -initSuccessful command reply:
MFT Server Database Application v. <MFT Server version number and release date>
Initializing application database...
Done.
-
Add an administrative user account. This is the account used to log in to the MFT Server Manager user interface. MFT Server Manager is where you configure MFT Server and its associated services, Users, Trading Partners, etc. Run the following command:
./js-addadmin -db -username [username] -password [password] -saExample:./js-addadmin -db -username admin -password secret -saSuccessful command reply:
MFT Server Create Administrator Application v. <MFT Server version number and release date>.
Creating administrator 'admin'...Done.
-
Configure Administration Service.
The Administration service is used to provide programmatic access to MFT Server using the
Java Management API. Historically, the MFT Server Manager UI was written using the Java Management API. The UI was rewritten using the REST API. Although the user interface written using the Java Management API has been retired, the ability to access MFT Server using the Java Management API is still supported.Note: If you do not plan on using Java API calls, you can disable the host and port (after the installation) by accessing the MFT Server Manager user interface, then navigating toSettings > MANAGER SERVICE > Manager Service. Uncheck theEnable Manager Servicecheckbox.Enter the following command to configure the Administration Service:
./js-server-configuration -host [ip address] -port [port] -timeout [timeout in seconds]Example:./js-server-configuration -host 0.0.0.0 -port 10880 -timeout 60This will configure your MFT Server Administration Service, where [ip address] and [port] are the IP/port that you want the MFT Administration Service to listen on, The default port is 10880. The [timeout in seconds] is the timeout value for this service.
Successful command reply:
MFT Server Management Configuration Application v <MFT Server version number and release date>.
Saving configuration...
Done.
Note: The IP address0.0.0.0is a special address that instructs the service to listen on all available network interfaces. -
Configure the Web/REST settings.
The Web/REST settings are configured for access to MFT Server via the MFT Server Manager web-based user interface, and for programmatic access using REST API calls. MFT Server Manager is the interface used to manage all aspects of MFT Server, like creating services, Users, Trading Partners, and configuring settings. The same type of configurations can be performed programmatically using REST API calls. The MFT Server Manager was written using the REST API. The REST
IPandportidentify the IP and port that MFT Server listens on.Run the following command:
./js-web-configuration -host [REST ip address] -port [REST port] -timeout [timeout in minutes]- Port 11880 is the default port.Example:./js-web-configuration -host 0.0.0.0 -port 11880 -timeout 10Successful command reply:
MFT Server Web Configuration Application v <MFT Server version number and release date>.
Saving configuration...
Done.
-
Configure the credentials used when invoking command-line utilities. Make sure the user and password parameters match the username and password that were used earlier in the
js-addadmincommand (Step 4).Run the following command:
./js-client-configuration -host [host] -port [port] -timeout [timeout in seconds] -user [username] -password [password]Example:./js-client-configuration -host 0.0.0.0 -port 10880 -timeout 60 -user admin -password secretSuccessful command reply:
MFT Server Client Configuration Application v <MFT Server version number and release date>.
Saving configuration...
Done.
-
Generate a Server Key. Run the following command:
./js-add-server-key -rsa -size 4096 -alias example_rsa- Note, example_rsa is the name of the key. Feel free to name it whatever you would like. The recommended key size is 4096.Note: The Server Key can also be created using the MFT Server Manager, after the installation. SeeKeys > Server Keys > Generate > Generate Key.Successful command reply:
MFT Server Create Server Key Application v. <MFT Server version number and release date>
Creating server key '<key name>'...
Done.
-
Copy the license key file to the
etcdirectory that is relative to MFT Server's installation directory (e.g., /opt/mft_server/etc). This must be done before attempting to start the service.Note: The license key file is provided to each customer in a zip file. The MFT Server license is in the zip file'sJSCAPE MFT Serverfolder. It is namedlicense.lic. -
Startup Administration Service. Run the following command:
./start_service.sh
Successful command reply:
Starting Server
To verify that MFT Server is running, enter: ps aux | grep mft_server
If MFT Server is not running, navigate to the MFT Server log file: /<installdir>/mft_server/var/log
Enter: cat server0.log - This displays the contents of the file in the terminal window.
Once your system is up and running, you can access the web-based user interface named MFT Server Manager. The URL to enter in your web browser (e.g., http://localhost:11880) is based on the information you entered in Step 6 of the installation process. After successfully accessing the application, you will be prompted login. The credentials to use are based on the account information you specified in Step 4 of the installation process. See the links below for more details.
See also
Accessing the user interface - MFT Server Manager - This is the web-based application used to configure and manage MFT Server.
Auto-start using SysVinit scripts
If you intend to run MFT Server on Java 9 or Java 10 read Running on Java 9 or above
See also
Redwood University - JSCAPE On-premise MFT Installation. Select Installing JSCAPE MFT Server.