Microsoft Azure Blob Service trading partner
This Trading Partner exchanges data with a Microsoft Azure Blob Service.
Adding the Microsoft Azure Blob Service Trading Partner
Navigate to the [Domain] > AUTOMATION > Trading Partners module. Click Add. The Add Trading Partner dialog displays. Select Microsoft Azure Blob Service as the Protocol from the dropdown list, then click OK.
The Add "Microsoft Azure Blob Service" Trading Partner dialog displays, as shown in the image below.
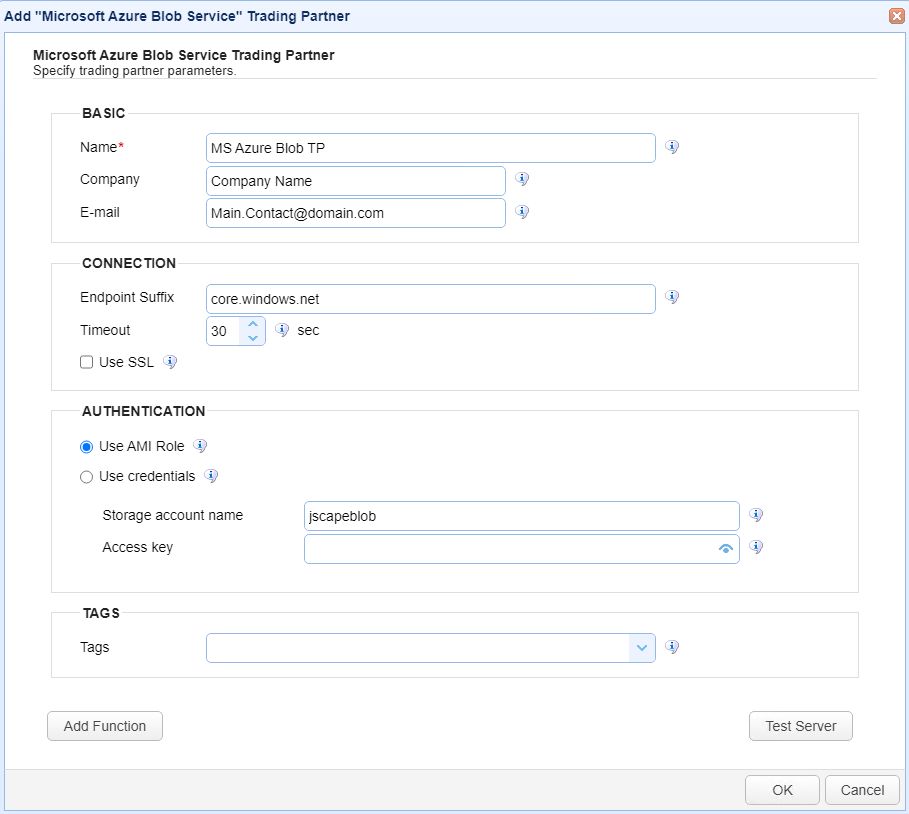
BASIC
Name — Identifies the unique name to assign to the Trading Partner. Enter a name that best describes the Trading Partner, since the name is displayed when using the partner in MFT Server features that support it.
Company — Identifies the name of the company that the Trading Partner represents.
E-mail — Identifies the primary email address for the Trading Partner.
CONNECTION
Endpoint Suffix — Identifies the endpoint suffix for the Microsoft Azure Blob Service. The default value is core.windows.net.
Timeout — Identifies the maximum time (in seconds) for establishing a connection to the Azure Blob Service.
Use SSL — If selected, enables SSL protection (HTTPS) for the connection.
AUTHENTICATION
Use AMI Role — If selected, a system-assigned or user-assigned Azure Managed Identity is used for authentication.
System-assigned Managed Identify
On the Azure resource (e.g., the VM) where MFT Server is installed, navigate to the Identity section and enable System-assigned managed identity.
Using the Azure portal, navigate to your Blob Storage account.
Under Access Control (IAM), click Add Role Assignment.
Select a role that provides the necessary access, such as Storage Blob Data Contributor (for read, write and delete access to blobs).
In the Select box, search for and choose your VM’s system-assigned Managed Identity. Click Save to apply the role assignment.
User-assigned Managed Identity
Using the Azure portal, create a Managed Identity.
On the Azure resource (e.g., VM) where MFT Server is installed, assign the Managed Identity under the Identity > User Assigned tab.
Using the Azure portal, navigate to your Blob Storage account.
Under Access Control (IAM), click on Add Role Assignment.
Select a role that provides the necessary access, such as Storage Blob Data Contributor (for read, write, and delete access to blobs).
In the Select box, choose your VM’s user-assigned managed identity. Click Save to apply the role assignment.
Use credentials — If selected, a static account and access key is used for authentication.
Storage account name — Identifies the storage account name for the remote Microsoft Azure Blob Service. This is the unique namespace for your data.
Access key — Identifies the access key to the storage account for the remote Microsoft Azure Blob Service. Not applicable if using the AMI Role authentication method.
TAGS
Tags — If selected, identifies the one or more tags used to limit administrative access to the Trading Partner.
Example using the Microsoft Azure Blob Trading Partner in a Trigger Action
Triggers are created on the domain-level in AUTOMATION > Triggers. Triggers listen for events (e.g., a file upload) and respond with one or more Trigger Actions. There are many Trading Partner-specific Trigger Actions. This example does not provide all the steps when creating a Trigger; it describes how a Trigger Action is configured using the Microsoft Azure Blob Trading Partner. For a complete discussion about Triggers, see Adding triggers
Assume, when a Trigger event occurs, you would like MFT Server to automatically upload a file to an Azure Blob Trading Partner.
To accomplish this, add an Action to the trigger, in the Trigger Actions tab. The Action to add is Trading Partner File Upload as shown in the image below.
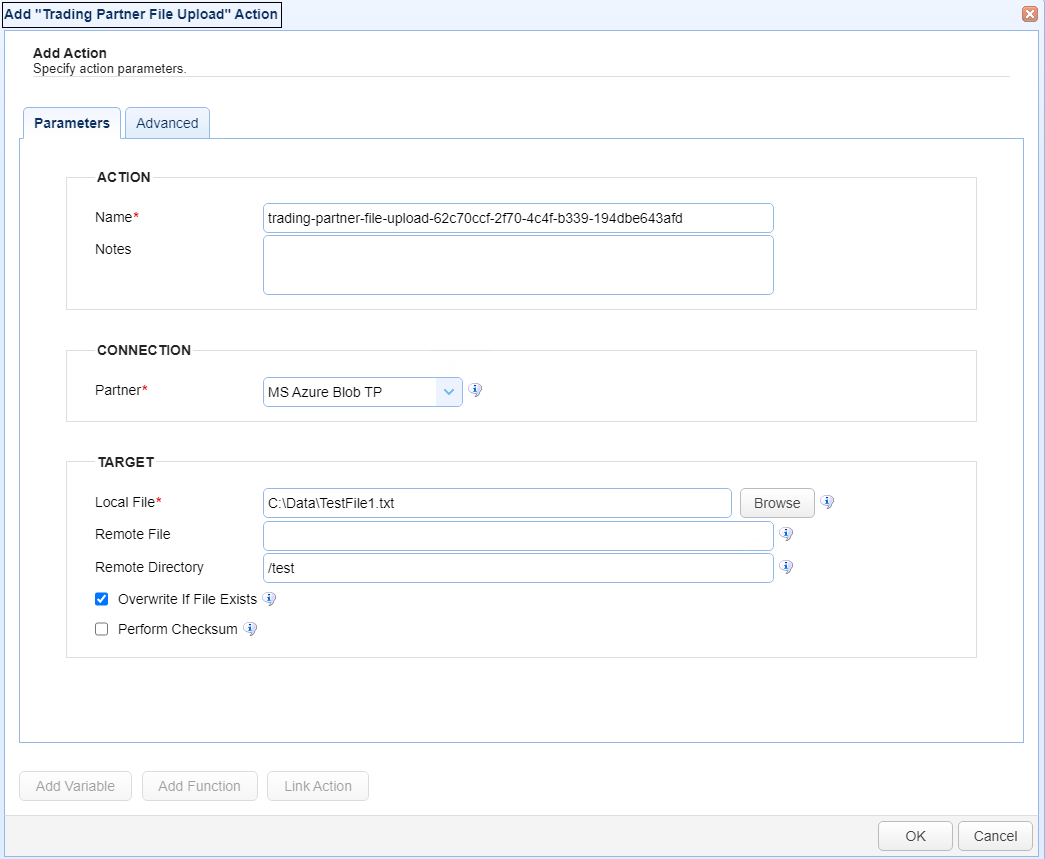
Name — Identifies the name of the Action. The system-generated default name, depicted in the image above, can be changed to a different name to suit your preferences. The Name must be unique within the current Trigger workflow.
Notes — Describes the action.
Partner — Identifies the Trading Partner name. Select the Azure Blob Trading Partner from the dropdown list.
Local File — Identifies the local file on the MFT Server to upload to the Azure Blob Trading Partner.
Remote File — Identifies the file name to upload. This optional field lets you to specify an alternative remote file name (one that is different from the source file name). You can specify the file's full path (directory and file name), or just the file name. If only the file name is specified, the user's root path is used as the location to upload the file. This field's value takes precedence over the Remote Directory field (described below). The Remote Directory field is ignored when the Remote File field has been configured (i.e. it is not blank).
Remote Directory — Identifies the directory name where the file is uploaded to in the Azure Blob storage. It is only used when the Remote File field is blank. When used, the remote location is constructed using the Remote Directory name and the source file name.