Microsoft OneDrive/SharePoint trading partner
This trading partner exchanges data with a Microsoft OneDrive or SharePoint service. MFT Server will initiate the connection to the trading partner. It is assumed that the Microsoft Azure administrator has provided you with the details needed to set up this trading partner.
Adding the Microsoft OneDrive trading partner
In the desired domain, navigate to the AUTOMATION > Trading Partners module. Click on the Add button, or right click anywhere in the grid area and select Add from the pop-up menu. In the Add Trading Partner dialog window, select Microsoft OneDrive/SharePoint as the Protocol, then click OK. The Add "Microsoft OneDrive/SharePoint" Trading Partner dialog will appear as depicted in the image below.
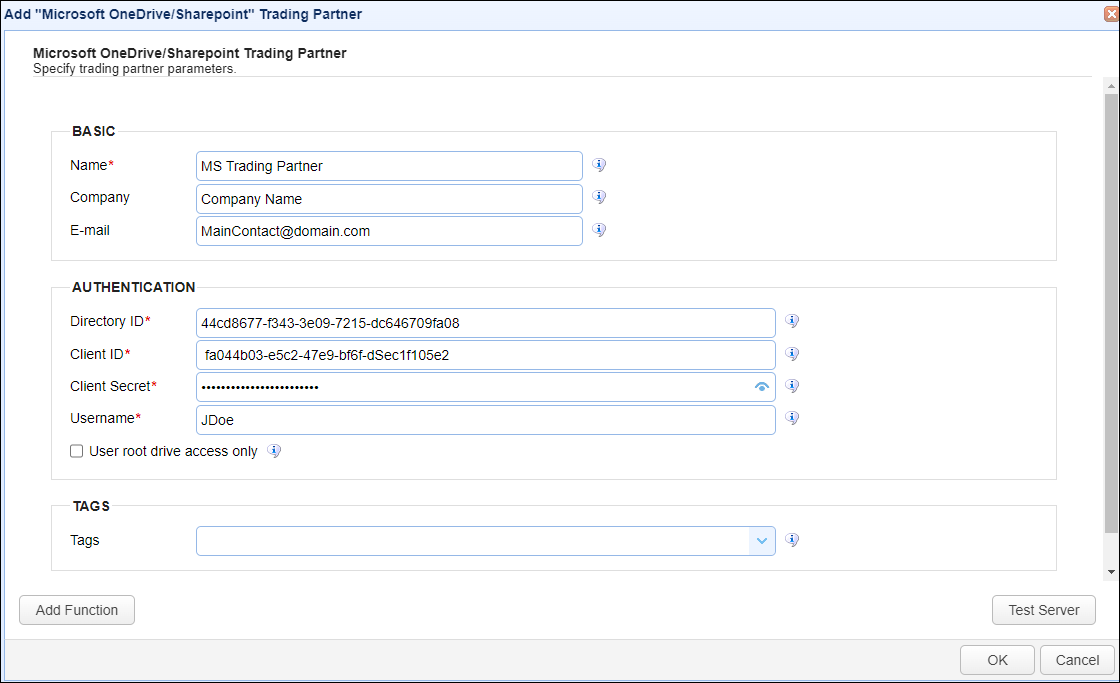
Basic
Name - The unique name to assign to this trading partner. Enter a name that best describes the trading partner, as you will be selecting the name when using the partner in MFT Server features that support it.
Company - The name of the company that this trading partner represents.
E-mail - The primary email address for this trading partner.
Authentication
The authentication fields are obtained using the MS Entra ID admin, after an app registration is created using this application. Click on this link: Microsoft Entra ID application registration for details on how to register the application.
Directory ID - Directory (tenant) ID as taken from the Overview page of the Microsoft Entra admin center.
Client ID - Application (client) ID as taken from the Applications > App registrations page of the Microsoft Entra admin center. Locate your application and copy the Application (client) ID.
Client Secret - Client secret as taken from the Applications > App registrations page of the Microsoft Entra admin center. Select your application, then click on Certificates & secrets, then copy the client secret's Value field.
Username - Enter any valid Entra ID UPN. This field is not in use at this time.
User root drive access only - When checked, access will be limited to the user's default drive (the root drive, named OneDrive). Leave this box unchecked so that access to users and their associated drives can be obtained through SharePoint site(s).
Tags
Tags - If specified, this is the one or more tags that are used to limit which administrators have access to this trading partner.
Microsoft Entra ID application registration
Go to the Microsoft Entra ID admin center application.
From the left-hand side menu, select Applications > App registrations.
Click on + New registration and enter a Name. Click on the Register button.
From the App Registrations > Overview section, click on the Add a certificate or secret link.
From the App Registrations > Certificates & Secrets page, select + New client secret.
Enter a Description and choose a value for the Expires field. This indicates how long the client secret is valid for.
Click on the Add button, then copy-paste the Value field, which is the actual client secret. You will see this on the App registrations page, where your newly added client secret record is displayed.
From the App Registrations > Manage section, select API permissions. The registered application's API Permissions determines OneDrive/Site access. See below.
Click on + Add a permission, then click on Microsoft Graph.
Click on Application permissions (not Delegated permissions).
Enter sites in the Select permissions search bar, then expand Sites. The permissions to use (check) reduce down to two options: check any one of the Sites.xxxxx.All options - or check Sites.Selected.
Checking a
Sites.xxxxx.Alloption is the least complicated because that is all you will need to do. It is also the only choice if running an MFT Server version prior to 2024.2. However, this grants the App registration access to all SharePoint sites and therefore MFT Server as well.
Checking
Sites.Selectedlimits the sites that the App registration can access. An Entra ID admin must explicitly grant permissions to the sites that it can access. Please note that this only works with MFT Server 2024.2 and higher.
After making your selection, click on the Add permissions button.
On the API permissions (configured permissions page), click Grant admin consent for <domain> button, then click Yes to confirm.