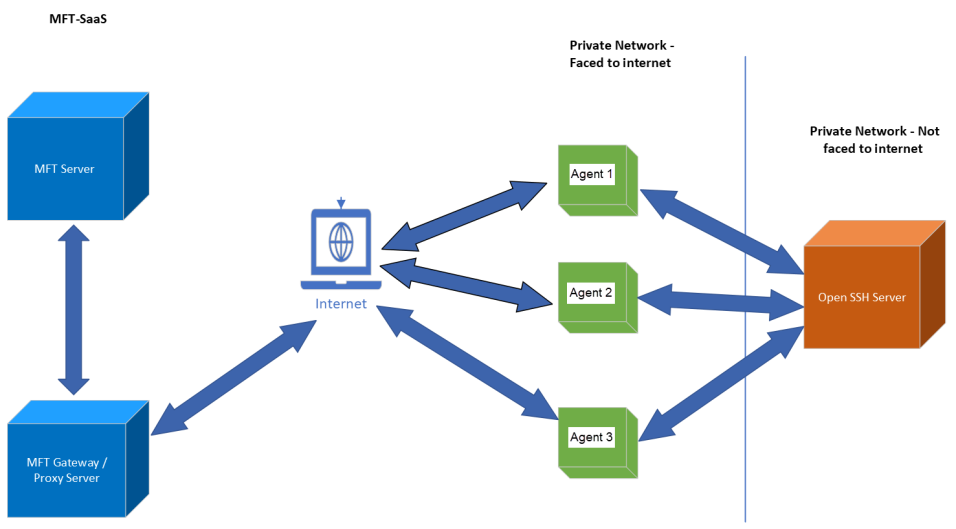
JSCAPE SaaS and MFT Gateway
A JSCAPE SaaS installation includes two components.
-
MFT Server
-
MFT Gateway
MFT Server is a platform-independent managed file transfer solution.
MFT Gateway is a platform-independent server that functions as a reverse proxy and load balancer. It facilitates file transfers between a JSCAPE SaaS environment and your internal private network.
MFT Gateway (Gateway) works with an MFT Gateway Agent (Agent).
-
The Agent is installed on an Internet-facing system in your internal private network.
-
The Agent makes an outbound connection to the Gateway in the JSCAPE SaaS environment.
-
MFT Server connects to the Gateway, and the Gateway delegates the request to the Agent using the connection previously established by the Agent.
-
The Agent makes the connection to the service in your internal private network and sends the request.
There are several steps that need to be taken to facilitate access to your internal private network.
-
Using the Gateway Admin console, configure the Gateway service that comes pre-installed in the JSCAPE SaaS environment.
-
Install an Agent on a system in your internal private network.
-
Using the MFT Server Admin console, create a Trading Partner and a Trigger that includes a Trading Partner Trigger Action.
Gateway Configuration
1. Using the URL provided to you by Redwood Software, log in to the MFT Gateway Admin console in the SaaS environment. The URL will look similar to this: admin.gw.tenantname.jscapemft.cloud. Contact support for the login credentials.
2. Navigate to Keys > Server Keys and check if a Server Key is present in the grid. The Server Key is used to enable the Agent service. If there is no key, create one as described in the MFT Gateway guide – Generating a key. Create a key greater than or equal to 2048 (length).
3. Navigate to Agents > Service to enable the Agent Service.
Click
Edit.
The
Agent Service Configurationdialog displays.
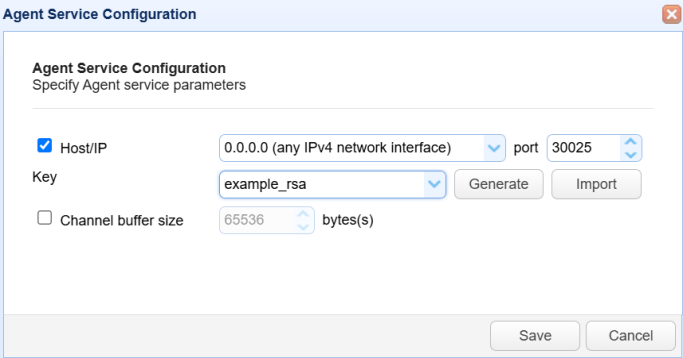
Host/IP — Identifies the Gateway system that is listening for incoming Agent connections. Select
0.0.0.0 (any IPv4 network interface)from the dropdown list. The port number must be 30025.
Key — Identifies the key created in Step 2.
Click
Save.
4. Navigate to Agents > Agents to add an Agent.
Click
Add.
The
Add Agentdialog displays.
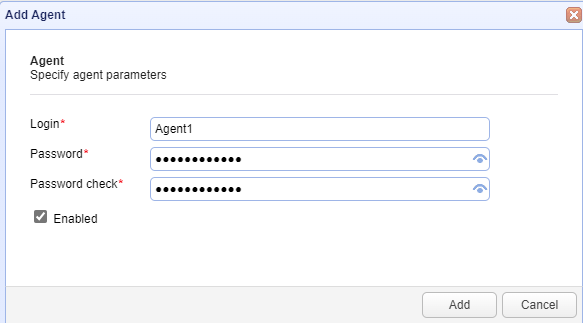
Login — Identifies the Agent user name.
Password — Identifies the Agent password.
Password check — Identifies (confirms) the Agent password.
Enabled — Enables the Agent. The Agent must be enabled for the feature to work.
The Agent credentials (user name and password) are required when you install the Agent component, described in the next section.
5. Navigate to Services > Services to add a proxy service.
Click
Add.
The
Proxy Service Protocolsdialog displays.
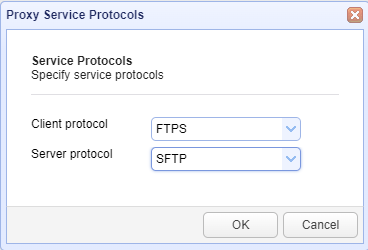
Client protocol — Identifies the protocol used when connecting from the MFT Server service to the Gateway service. The Client selection will dictate the available options when you select the Server protocol.
Server protocol — Identifies the protocol used by the Agent to connect to the service on your internal private network. Click
OK.
The
Add [protocols selected] Proxy Servicedialog displays.
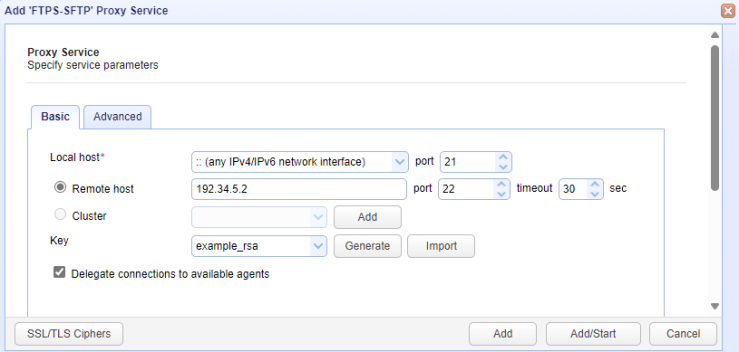
Local host and port — Identifies the port and IP of the Gateway server that is listening for MFT Server connections. It can be:
0.0.0.0 (IPv4 interface)or127.0.0.1or:: (any IPv4/IPv6 interface). The port is the default port associated with the previously selected Client protocol.
Remote host and port — Identifies the port and IP or fully qualified domain name (FQDN) of your internal private network system that the Agent connects to. The port is the default port number associated with the previously selected Server protocol.
Delegate connections to available agents — Identifies that the proxy service will be able to delegate requests to the Agent. This must be selected.
Click
AddorAdd/Start. The proxy service must be started to enable the feature.
Agent Installation and Configuration
Install the Agent on your internal network system facing the Internet (see Download).
Click on the appropriate link below for installation instructions. The instructions will pull up a page from the MFT Gateway guide.
-
Installing on Windows - Expand MFT Gateway Agent Installation.
-
For all other operating systems, see Installation, then select the submenu item that is applicable to the OS you are using.
-
Follow the instruction for the
MFT Gateway Agentinstallation (the page includes both Gateway and Agent installation instructions). Make sure you are following theAgentinstallation steps.
-
gw.tenant.jscapemft.cloud. The port is 30025, and this cannot be changed. The Agent login and Agent password are the username and password created above in Step 4.
Upon a successful connection and log in by the Agent to the Gateway, you will see a record in the Gateway Admin UI in the Agents > Service tab. See the image below.

If you do not see a record in this view (the Agent has not successfully connected), refer to the Agent log file to see if any information posted offers some clues. The log file is located on the Agent system in the <MFT Gateway Agent installation dir>\var\log folder.
MFT Server Configuration
As a final step, a Trading Partner must be created, along with a Trigger that includes a Trading Partner Trigger Action.
-
A
Trading Partneridentifies the service MFT Server connects to, which is the MFT Gateway. Using the previously configured proxy service, the Gateway delegates the request to the Agent. -
A
Triggeris a feature that allows MFT Server to listen for an event. When the event occurs, the Trigger will execute one or more configured Actions. The Action identifies the connection, which is configured in the previously created Trading Partner. The Action also determines the type of request made to the internal private network. For example, upload a file, or move a file.
Using the URL provided to you by Redwood Software, log in to the MFT Server Admin console.
1. Create a Trading Partner
The following documentation highlights key points. For a full description regarding creating a Trading Partner, see Adding trading partners
-
Navigate to Domain >
AUTOMATION > Trading Partners.
-
Click
Add. -
An
Add Trading Partnerdialog displays.-
Protocol — Identifies the proxy service created in Step 5. Use the same protocol specified for the
Client. ClickOK. -
An
Add [Protocol name] Trading Partnerdialog displays. -
The fields will vary depending on the selected Protocol, but the critical fields are:
-
Name — Identifies the name of the Trading Partner, which is used in a Trading Partner Trigger Action.
-
Host/IP — Identifies the IP address of the Gateway server. Since it is the same as the MFT Server, enter 127.0.0.1
-
Credentials — Identifies the user that will authenticate on the internal private network system.
-
-
-
Click
OK.
2. Create a Trigger with a Trading Partner Trigger Action
The following documentation highlights key points. For a full description regarding creating a Trigger, see Adding triggers.
-
Navigate to Domain >
AUTOMATION > Triggers > Triggers. -
Click
Add. -
A
Trigger Templatedialog displays.-
Select a Template or leave the Template field blank, then click
OK.
-
-
Click on the
Actionstab.-
The Actions canvas area displays.
-
Click
Add. -
An
Add Actiondialog displays.-
Action — Select one of the Trading Partner Trigger Actions from the dropdown list. The Action defines the type of request the Agent makes to your internal private network system.
-
-
Click
OK. -
An
Add [Trading Partner Action type] Actiondialog displays.-
Partner — Identifies the Trading Partner to connect to. Select the Trading Partner you created in Step 1.
-
Populate the remaining fields accordingly (they will vary depending on the Action selected). Click
OK.
-
-
In the Actions canvas area, add a link from the built-in Workflow's
Startoutput to the Trading Partner'sExecuteinput.
-
-
In addition to adding a Trading Partner Action, you also need to enter the required fields on the Trigger's
Parameterstab.Click
OK.
-
Port 30025 is used for bidirectional communication between the Agent and Gateway.
-
The port used for MFT Server and Gateway communication depends on the Client protocol selected when setting up the Gateway Proxy Service in Step 5.
The MFT Gateway Agent can be downloaded from the JSCAPE website. Click on the Download Now link associated with the JSCAPE MFT Gateway product. Under the JSCAPE MFT Gateway Agent Installers heading, select the installer for the appropriate OS platform the Agent will be installed on.